


Knitted Alligator
Create an easy and quick knitted alligator with this free knitting pattern. You kids will love it and its a great idea for a gift. By Debra L. Rodriquez
Knitted Alligator Materials
- Needles: US 9 Straight
Gauge is not important for this pattern
- Yarn: 100% Wool for felting
- 1 skein Lion Brand Wool in Sage
- 1 skein Lion Brand wool in Scarlet (85grams / 158 yards per skein)
Additional Materials:
- Wool Roving for needle felting details Embroidery Floss DMC #33641
- Yarn needle
Knitted Alligator Top Body Instructions
Cast on 10 Stitches
Rows 1-10: Work in Stockinette Stitch
Rows 11-20: Work in Stockinette Stitch, Increase 1 stitch at the beginning and end or each Right side row starting with Row 11
Rows 21-28: Work in Stockinette Stitch
Row 29: Knit 5, Make bobble, Knit 9, Make bobble, Knit stitch
Row 30: Purl
Rows 31-36: Work in Stockinette Stitch
Row 37: Knit 5, knit 2 together, knit 5, knit 2 together, Knit 6 – 18 stitches
Row 38: Purl
Row 39: Knit 5, knit 2 together, knit 4, knit 2 together, Knit 5 – 16 stitches
Row 40: Purl
Rows 41-48: Work in Stockinette Stitch
Row 49: Cast on 10 stitches, Knit all stitches
Row 50: Cast on 10 stitches, Purl all stitches
Rows 51-56: Work in Stockinette stitch
Row 57: Bind off 8 stitches, Knit to end
Row 58: Bind off 8 stitches, Purl to end
Rows 59-68: Work in Stockinette Stitch
Row 69: Cast off 8 stitches, Knit all stitches
Row 70: Cast off 8 stitches, Purl all stitches
Rows 71-76: Work in Stockinette Stitch
Row 77: Bind off 8 stitches, knit to end
Row 78: Bind off 8 stitches. Purl to end
Rows 79-86: Work in Stockinette Stitch, knit 2 together at beginning and end of every Right side row
Row 87: Knit 4, Knit 2 together, Knit Stitch
Row 88: Purl
Rows 89-109: Work in Stockinette stitch decreasing as follows:
Row 93: Knit stitch, Knit 2 together, Knit 3
Row 98: Purl 4, Purl 2 together, Purl 3
Row 103: Knit 2, Knit 2 together, Knit 2
Row 105: Knit 2, Knit 2 together, Knit 2
Row 107: Knit 2 together, Knit 1, Knit 2 together
Row 109: Knit 3 together
Break yarn and pull through last loop on hook to secure
Weave in ends
Alligator Knitted Underbody Instructions
Cast off 6 stitches
Rows 1-10: Work in Stockinette Stitch
Rows 11-20: Work in Stockinette Stitch, Increase 1 stitch at beginning and end of all Right Side rows
Rows 21-35: Work in Stockinette Stitch
Row 36: Knit 5, Knit 2 together, Knit 3, Knit 2 together, Knit 5
Row 37: Purl
Row 38: Knit stitch, Knit 2 together, Knit 1, Knit 2 together, Knit stitch
Row 39: Purl
Rows 40-72: Work in Stockinette stitch, decrease by knit 2 together at the beginning and end of every Right Side row until 7 stitches remain
Row 73: Purl
Row 74: Knit 3, K 2 together, Knit 2
Row 75: Purl
Rows 76-96: Work in Stockinette Stitch and reduce by Knit 2 together once in rows 80,85,90,95
Row 96: Knit 3 together
Break yarn leaving an extra long tail to seam edges of top and bottom together.
Pull tail through last loop on the needle to secure
Embroidery Instructions
With 6 strands DMC floss in color #33641, Embroider around the bobble eyes and along the mouth and
feet as shown in the diagram.

Embroider X’ s to stitch snout closed and along the edges of each of the feet.
Needle Felting Instructions
With white wool and needle felting tool. Needle felt the whites of the eyes and 6 teeth on either side of the mouth just below the embroidery line.
Needle felt iris of the eyes with dark brown wool.
Seaming edges
With Right Side facing and starting at the tail end, use an extra long-tail from the underbody to stitch edges of top to the underbody. When you reach each of the legs, be sure to fold them to the inside before stitching edges together. Once you reach the snout, weave yarn along the underbody only leaving an opening at the end of the snout to be used for stuffing later. Continue seaming along the other edge until you reach the end of the tail. Cut yarn if necessary and weave in the remaining ends.
Reach into body thru snout opening and grab the tail end, pull right side out.
Machine felting instructions:
Here are all you need to know to create make your felted knitting project come to life!!
Put the piece in the washer along with a pair of jeans to add in agitation for the felting process. Put a washer on smallest load setting and set for Hot Wash, Cold Rinse at the longest/heaviest wash cycle. Check piece prior to rinsing cycle, if additional
felting is needed, start wash cycle over prior to rinsing.
Allow the piece to go through the full rinse and spin circles.
When the washer finishes, remove the piece and block if necessary. Lay flat to dry.
One piece is dry, stuff with polyfill, cotton batting, or your choice of soft filler.
Stitch snout closed with embroidery thread.
Follow diagrams and instructions for embroidery of additional details and needle felting.
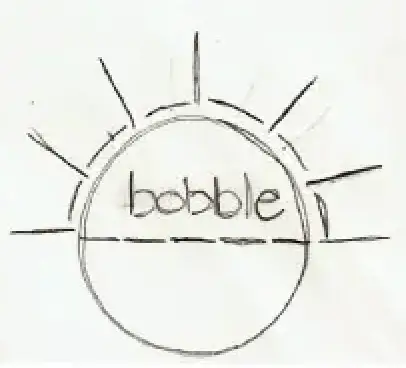
Bobble Instructions
Use the straight stitch to embroider around the back half of the bobble like sunrays- and secure it more firmly to the head. Use the backstitch to connect each of the straight stitches along the bottom of the bobble and then backstitch over the top of the bobble to make definition between the lid and eye area.
