


Crochet Stitch Guide: Holding A Crochet Hook
Learning a new skill is a difficult task to do. Today we will learn the basic stuff about crocheting. With this crochet stitch guide, you will learn how to hold a crochet hook and various crochet stitches.
HOLDING A CROCHET HOOK
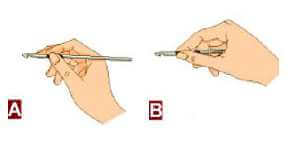
There are two ways to hold the hook.
A. Hold the hook between your index finger and thumb the way you hold the pencil. This method, which uses your wrist, is most often used when working with a thread of lightweight yarns.
B. Hold the hook between your index finger and thumb the way you hold a knife to spread butter or cut meat. This method, which uses your shoulder muscles, is most often used when working with yarn.
Note: Whether you are crocheting with a thread of yarn, use the method which is the most comfortable for you. There are no hard and fast rules about which method is correct.
STARTING YOUR CROCHET PROJECT
- To begin, create a swatch to make sure your gauge is correct.
- Chain your foundation row a little looser than the gauge so the bottom of your project will not pucker or pull inward.
- Carefully follow the written instructions or chart for creating the design.
- Sooner or later you are going to run out of yarn or thread. It’s best to join the new thread at the end of a row for a neater appearance. When you’re about to run out of thread, work your last stitch until there are 2 loops left on your hook. Leaving a tail, draw the end of the new yarn through the 2 loops on your hook. Then continue working with the new ball of yarn. With a large-eyed needle, weave in the tails of both balls of yarn to secure. This method is also used when joining a new color of yarn.
- With the abbreviations terms at hand, let’s look at a typical pattern. A pattern may be worked in rows (that is, back and forth to form a flat piece such as an afghan) or in rounds (worked around to form a tube with no seams, such as a hat).
- Whatever way the pattern is to be worked, the very first thing you must do is make a slip knot on your hook. Usually the pattern does not tell you to do this but it is always assumed that every project is started with a slip knot. See below for how to create a slip knot in 3 easy steps.
Tips:
Select a crochet design of your choice. Read the instructions carefully to make sure it is in your skill level and that you have the crochet thread and hook called for in the instructions. If you do not want to use the yarn or thread called for, you may substitute a yarn or thread that is the same weight and will produce the same gauge.
SLIP KNOT
Step 1
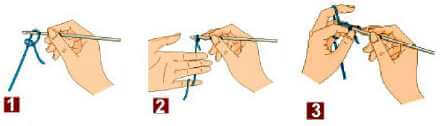
To begin, slide the hook into the knot, pull the two ends of thread to tighten the knot and form a loop.
Step 2 Holding the Thread
Hold the hook (which has been placed through the slip knot) in your right hand. Hold the bottom of the knot with your left thumb and index finger.
Hold the thread in your left hand so that it runs over the index finger, under the middle finger, over the ring finger and under the pinkie finger. Use the thread between the thumb and index finger to make the crochet stitches.
Step 3 Yarn Over
Refers to catching the thread in the groove of the hook by bringing the thread over the top of the hook from back to front.
Note: All the illustrations shown are for a right-handed crocheter.
CHAIN STITCH (CH)
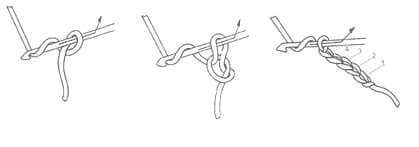
Yarn over, draw thread through lp on hook. Continue to yarn over and draw thread through loop until desired number of chains.
SLIP STITCH (SL)
For joining – insert hook in indicated st, yo and draw thread through st and lp on hook. For moving – yarn over—insert hook in indicated st, yo, draw through st and lp
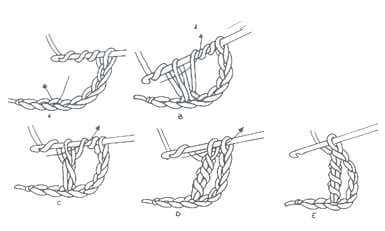
SINGLE CROCHET (SC)

Insert hook in stitch; yarn over and draw thread through, yo and draw thread through both loops on hook.
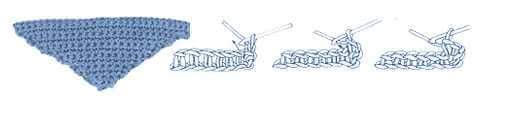
HALF DOUBLE CROCHET (HDC)
Yarn over, insert hook in stitch, yarn over and draw thread through, yo and draw thread through all 3 lps on hook.
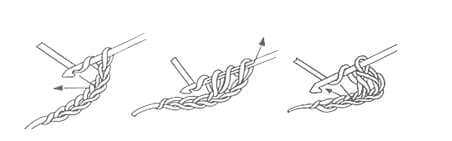
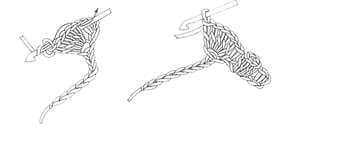
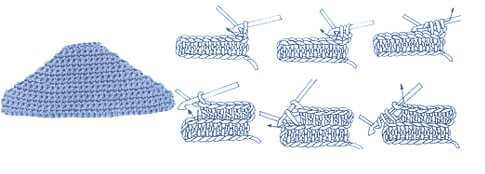
TRIPLE CROCHET (TR)
Yarn over twice, insert hook in 4th stitch from hook, yo, draw thread through, (yarn over and draw thread through 2 loops on hook) 3 times.
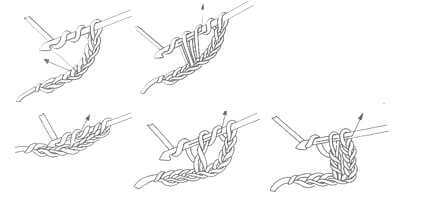
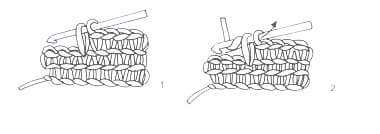
DOUBLE TRIPLE CROCHET (DBLTRC)
Yarn over 3 times, insert hook in 6th chain from hook, yarn over and pull through 2 loops; continue yo and pull through 2 loops until 2 loops left on hook, yo and pull through 2 loops, 1 loop left on hook.
PICOT (P)
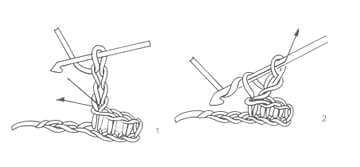
Chain 3, insert hook in 3rd stitch from hook and pull loop through.
POPCORN OF 5 DOUBLE CROCHET (PC5DBL)
Make five double crochet stitches in indicated stitch on the previous row. Leave the last loop of each stitch on hook; after 5th double yo and pull through all loops on hook.
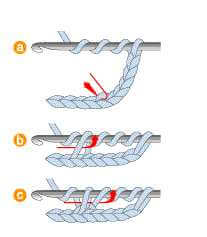
BACK POST DOUBLE CROCHET (BPDC)

Yarn over, insert hook from front to back between next 2 sts, then back again between the stitch being worked and the one after it on the previous row, yarn over and work dc.
FRONT POST SINGLE CROCHET (FPSC)
Yarn over, insert hook back to front between next 2 sts, then back again between the stitch being worked and the one after it on the previous row, yo and work single crochet.
INCREASE BY ONE STITCH IN SINGLE CROCHET
Insert hook in indicated stitch and pull up a loop, insert hook in next and pull up a loop. Yarn over, over draw through both loops.
DECREASE BY ONE STITCH IN SINGLE CROCHET
Insert hook in indicated stitch, and pull up a loop, insert hook in next stitch and pull up a loop, yarn over and pull through all 3 loops on hook.
