


Creating Beautiful Lacy Snowflake Patterns: A Complete Guide
Introduction
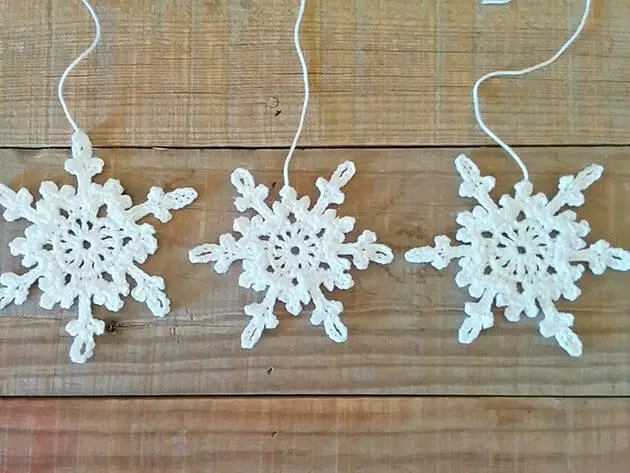
Welcome to the magical world of crocheted lacy snowflake patterns! If you’ve ever admired those delicate, intricate snowflakes adorning Christmas trees, windows, or holiday decorations, you’re in for a treat. In this comprehensive guide, we’ll walk you through everything you need to know about creating your own beautiful lacy snowflake patterns.
Crocheted snowflakes are not only stunning decorations but also make thoughtful handmade gifts. Each snowflake is unique, just like real snowflakes in nature, and the process of creating them can be both meditative and rewarding. Whether you’re a beginner looking to try your first snowflake pattern or an experienced crocheter seeking new techniques, this guide has something for everyone.
Why Crochet Snowflakes?
Crocheted snowflakes have a special place in the world of handcrafts for several reasons:
- They’re relatively quick projects that provide almost instant gratification
- They use minimal materials, making them economical to create
- They can be as simple or complex as you desire
- They make perfect holiday gifts and decorations
- The techniques learned transfer to other crochet projects
- They’re portable projects you can work on anywhere
Materials Needed for Lacy Snowflake Patterns
Before diving into the pattern instructions, let’s gather all the materials you’ll need:
Essential Materials:
- Crochet Thread : Size 10 thread is recommended for standard snowflakes. White is traditional, but don’t be afraid to experiment with colors or even metallic threads for a festive touch.
- Crochet Hook : Typically a size 7 steel hook (1.5mm-1.65mm) works best with size 10 thread. Adjust hook size based on your tension and the thread weight.
- Scissors : Sharp scissors for clean cuts.
- Tapestry Needle : For weaving in ends.
For Blocking and Finishing:
- Blocking Board or Mat : Cork boards, foam mats, or specialized blocking boards work well.
- Rust-Proof Pins : For pinning snowflakes during blocking.
- Stiffening Solution : Options include commercial fabric stiffeners, liquid starch, white glue diluted with water, or even sugar water solution.
- Glitter or Metallic Thread (optional): For adding sparkle to your finished snowflakes.
Getting Started: Basic Techniques
Starting Your Snowflake
Most lacy snowflake patterns begin with one of these two methods:
- Magic Loop/Magic Ring Method :
- Creates a tight center that can be pulled closed
- Prevents a hole in the middle of your snowflake
- Provides a clean starting point for your pattern
- Chain Ring Method :
- Create a specific number of chains (usually 4-6)
- Join with a slip stitch to form a ring
- Work the first round into this chain ring
Essential Techniques for Lacy Snowflakes
To create the delicate, lacy appearance characteristic of snowflake patterns, you’ll need to master a few key techniques:
- Picots : These small loops create the pointed tips on snowflake arms. They’re typically formed by chaining 3 stitches and then working a slip stitch into the first chain.
- Chain Spaces : Many snowflake patterns use chain spaces to create openwork areas. These are simply chains that span between other stitches, creating “windows” in your work.
- Working in Rounds : Snowflakes are typically worked in rounds from the center outward, with each round adding more detail and dimension.
- Joining Rounds : Most patterns will have you join each round with a slip stitch before beginning the next round.
Step-by-Step Lacy Snowflake Pattern
Note : This pattern is based on research of typical lacy snowflake patterns and not from a specific PDF. Feel free to modify it to create your own unique designs.
Materials for This Pattern:
- Size 10 crochet thread (white)
- 1.5mm steel crochet hook
- Scissors
- Tapestry needle
- Blocking supplies
Pattern Instructions:
Round 1 : Begin with a magic ring. Ch 3 (counts as first dc), work 11 more dc into the ring. Join with a sl st to top of beginning ch-3. (12 dc)
Round 2 : Ch 1, sc in same st, ch 5, skip 1 dc, sc in next dc , repeat from * to * 5 more times, ch 5, join with a sl st to first sc. (6 sc, 6 ch-5 spaces)
Round 3 : Sl st into first ch-5 space, ch 1, (sc, ch 3, 3 dc, ch 3, sc) all in same ch-5 space, sc in next sc , repeat from * to * 5 more times, omitting the last sc. Join with a sl st to first sc. (6 snowflake points formed)
Round 4 : Ch 7, sc in middle dc of 3-dc group from previous round, ch 7, sl st in sc between points , repeat from * to * 5 more times. Join with a sl st to starting point.
Round 5 : Sl st to center of first ch-7 space, ch 1, (sc, [ch 3, picot, ch 3, sc] 3 times) all in ch-7 space, sc in next sc, (sc, [ch 3, picot, ch 3, sc] 3 times) in next ch-7 space, sl st in next sl st , repeat from * to * 5 more times, omitting the last sl st. Join with a sl st to first sc.
Finishing : Fasten off, weave in ends. Block and stiffen as desired.
Blocking and Stiffening Your Snowflakes
Blocking and stiffening are crucial steps that transform your snowflake from a floppy piece of crochet into a firm, structured decoration.
Blocking Process:
- Prepare Your Blocking Surface : Cover your blocking board with plastic wrap or wax paper if using a stiffening solution.
- Pin Your Snowflake : While damp, pin your snowflake to the blocking board, stretching it gently to shape. Use rust-proof pins and place them at strategic points to create even, symmetrical shapes.
- Apply Stiffening Solution : You have several options:
- Commercial Fabric Stiffener : Follow package directions
- Homemade Stiffener : Mix equal parts white glue and water
- Sugar Solution : Dissolve 1/4 cup sugar in 1/2 cup water, heat until clear
- Liquid Starch : Use full-strength for maximum stiffness
- Drying Time : Allow 24-48 hours for complete drying, depending on the solution used and humidity levels.
- Finishing Touches : Once dry, carefully remove pins. If desired, add a light dusting of glitter or metallic thread for sparkle.
Common Crochet Abbreviations for Snowflake Patterns
Understanding the abbreviations used in crochet patterns is essential for success. Here’s a comprehensive list of abbreviations commonly found in snowflake patterns:
Basic Stitch Abbreviations
- ch : Chain stitch – Yarn over, pull through loop on the hook
- sc : Single crochet – Insert hook, yarn over, pull through, yarn over, pull through both loops
- hdc : Half double crochet – Yarn over, insert hook, yarn over, pull through, yarn over, pull through all three loops
- dc : Double crochet – Yarn over, insert hook, yarn over, pull through, yarn over, pull through two loops, yarn over, pull through remaining two loops
- tr : Treble crochet – Yarn over twice, insert hook, yarn over, pull through, (yarn over, pull through two loops) three times
- dtr : Double treble crochet – Yarn over three times, insert hook, yarn over, pull through, (yarn over, pull through two loops) four times
- sl st : Slip stitch – Insert hook, yarn over, pull through stitch and loop on hook
Pattern-Specific Abbreviations
- sp : Space
- ch-sp : Chain space
- sk : Skip
- st(s) : Stitch(es)
- rep : Repeat
- rnd : Round
- beg : Beginning
- tog : Together
- picot : Usually ch 3, sl st in first ch
- RS : Right side
- WS : Wrong side
Grouping Symbols
- [ ] : Work instructions within brackets the number of times specified
- ( ) : Work instructions within parentheses in the same stitch or space
- { } : Repeat instructions within braces as directed
- * * : Repeat instructions between asterisks as directed
Variations and Creative Ideas
Once you’ve mastered the basic snowflake pattern, consider these variations to expand your snowflake collection:
Size Variations
- Micro Snowflakes : Use size 20 or 30 thread with a 0.6-0.75mm hook for tiny ornaments
- Jumbo Snowflakes : Use bedspread cotton or light fingering weight yarn with a 2.5-3mm hook for dramatic window displays
Color Variations
- Ombré Effect : Use gradient threads or dip-dye white snowflakes
- Metallic Accents : Incorporate metallic thread as a carry-along with regular thread
- Multi-Color : Change colors between rounds for a rainbow effect
Embellishment Ideas
- Add seed beads or sequins during crocheting (thread them onto your yarn before starting)
- Attach tiny crystals or rhinestones after blocking
- Brush with fabric glue and sprinkle with fine glitter
Troubleshooting Common Issues
Even experienced crocheters encounter challenges with snowflake patterns. Here are solutions to common problems:
Problem: Snowflake Curling
Solution : Your tension may be too tight. Try using a larger hook or blocking more aggressively.
Problem: Uneven Points
Solution : Count stitches carefully and use stitch markers at the beginning of each point.
Problem: Stiffening Solution Leaving White Residue
Solution : Dilute your solution further or switch to a clear-drying commercial stiffener.
Problem: Snowflake Too Floppy After Blocking
Solution : Re-block with a stronger stiffening solution or double the concentration of your homemade stiffener.
Notable Snowflake Pattern Creators
Many talented designers have contributed beautiful snowflake patterns to the crochet community. Here are some notable creators whose work you might want to explore:
Deborah Atkinson (Snowcatcher)
- Website : Snowcatcher.net
- Specialty : Exclusively designs snowflake patterns with hundreds of unique designs
- Notable Work : Annual Snowflake Monday series featuring new designs each week
Lucy (Attic24)
- Website : Attic24.typepad.com
- Specialty : Colorful, accessible crochet designs including seasonal snowflakes
- Style : Beginner-friendly patterns with detailed photo tutorials
Julia Hart (Draiguna)
- Website : Draiguna.com
- Specialty : Intricate, mathematical snowflake designs
- Notable Work : Fractal-inspired snowflake patterns
Caitlin Sainio
- Books : “100 Snowflakes to Crochet” and “Crocheted Snowflakes”
- Specialty : Combining traditional techniques with innovative designs
- Style : Clear diagrams accompanying written patterns
Valuable Resources for Crochet Enthusiasts
To further develop your snowflake-making skills, check out these valuable resources:
Specialized Snowflake Pattern Websites
- Snowcatcher
- Specializes exclusively in snowflake patterns
- Features free weekly snowflake patterns
- Includes detailed blocking tutorials
- Ravelry Snowflake Groups
- “Snowflake-Along” group hosts annual challenges
- Pattern databases searchable by difficulty level
- Community support for troubleshooting
Books Worth Investing In
- “100 Snowflakes to Crochet” by Caitlin Sainio
- Comprehensive collection of patterns
- Clear diagrams and written instructions
- Ranges from simple to complex designs
- “Crocheted Snowflakes” by Jana Whitley
- Focus on thread crochet techniques
- Includes blocking and display ideas
- Seasonal variations beyond traditional designs
Video Tutorials
- Bella Coco Crochet YouTube Channel
- Slow-motion demonstrations of tricky techniques
- Beginner-friendly explanations
- Tips for working with fine thread
- Snowflake CALs (Crochet-Alongs)
- Seasonal events hosted by designers
- Step-by-step guidance through complex patterns
- Community support and inspiration
Conclusion
Creating lacy snowflake patterns is a rewarding craft that combines technical skill with artistic expression. From the initial chain to the final blocking, each step contributes to a beautiful finished piece that can be treasured for years to come.
Remember that like real snowflakes, no two crocheted snowflakes need to be exactly alike. Feel free to experiment with different techniques, threads, and embellishments to create your own unique collection. The joy of crochet snowflakes lies not just in the finished product but in the peaceful, meditative process of creating them.
Whether you’re making snowflakes for your own holiday decorations or as heartfelt gifts for others, we hope this guide has provided you with the knowledge and inspiration to create beautiful lacy snowflake patterns. Happy crocheting!
Disclaimer
This blog post provides general instructions for creating lacy snowflake patterns based on research of common techniques and approaches. The pattern included is not from a specific PDF but represents typical construction methods for crocheted snowflakes. We encourage readers to explore the resources mentioned for additional patterns and techniques.
Have you created crochet snowflakes before? Share your experiences or questions in the comments below!
