

Japanese Charted Patterns Guide
Japanese charted patterns are different from the written patterns that we know. There are almost no written instructions for the techniques used in garment creation. These techniques were taught in knitting classes offered in “Brides’ Schools”. Women were supposed to go to schools to learn things they would need to know as wives like the knitting. Knitting was an important part of the information they learned, and even special classes were exist for it. In China today, people still pass down this knitting techniques they learned from generation to generation, the way our ancestors used to do. Written patterns we know was not so common for the people at Chine. A person is supposed to be able to knit a garment just by looking at a picture of it.
We don’t need to learn the Japanese language to use this techniques. There are only a few symbols used, and these are easy to learn.
While Japanese patterns tend to be more standardized than the written patterns used in the Western world, there are still some differences in the way they are charted. The biggest difference in the knitting pattern is the shaping formula. Some patterns use stitches-rows-times, and some use rows-stitches-times. Suppose that for the armhole we must first bind off 6 stitches at the base, then decrease 1 stitch every other row 5 times. A pattern using the stitches-rows-times formula would use the notation, (6 plus the stitch symbol), 1-2-5. A pattern using the rows-stitches-times formula would use the notation (6 plus the stitch symbol), 2-1-5.
Japanese Charted Patterns Gauge Informations
Gauge is always given in stitches and rows per 10 cedi meters, rather than stitches and rows per inch. This may be confuse some knitters , but reallyit’s easy to learn how to read this patterns. 10 cedi meters is nearly the same as 4″. Sometimes dividing by 4 will give you a usable gauge. Ok yarns may need a stitch or two to compensate for the slight difference; unless the gauge is 8 stitches per inch or finer. Two or three extra stitches at each side seam will be enough, even on large sizes. One of the best tool you going to need is a tape measure that gives inches and centimeters, we recommend you to be in the same side. These kind of equipment it can be hard to find , but you can find anything in the internet don’t worry. If you cannot find this type of measure we suggest you to pinch the tape at exactly the point where the measurement lies; while holding the tape, turn it over, and read exactly the same point on the other side. Easy right ?! Also, if you don’t mind a little math, 2.54 cm equal 1 inch; therefore, divide cms by 2.54 to convert into inch measurements. A calculator will be really handy.
You can find the gauge as written text at the top of the page. Be carefull sometimes the lines of text go back and forth horizontally, like the Western writing we know about, and sometimes they go up and down, you will begin at the top right edge, and proceed from right to left. The gauge is usually hidden in the text, so you have to pay some attention and find it out. Most of the other writing covers only the same kind of information that is usually found at the top of our written patterns, and includes type of yarn, how many ounces, what colors are used, finished measurements of the garment, and tension settings. Usually only one size is given. Is up to you to decide when to stop and how large your project will be. The arrows on the chart indicate knitting direction, and there may be a few very brief instructions, such as: “Sweater, K with 2 strands. 1 x 1 Rib, K single strand. Purl side is the right side.” However, actual knitting instructions are not included.
Understanding the Japanese Charted Patterns symbols
In the next section, we will convert the pattern chart, and turn it into a easy written pattern to understand and start work on it. It would be a really good idea to print out all of this information above, because you will spend some time to study this information’s, and it helps to be able to look at a printed page, without the need read from a computer screen. Like the old times!
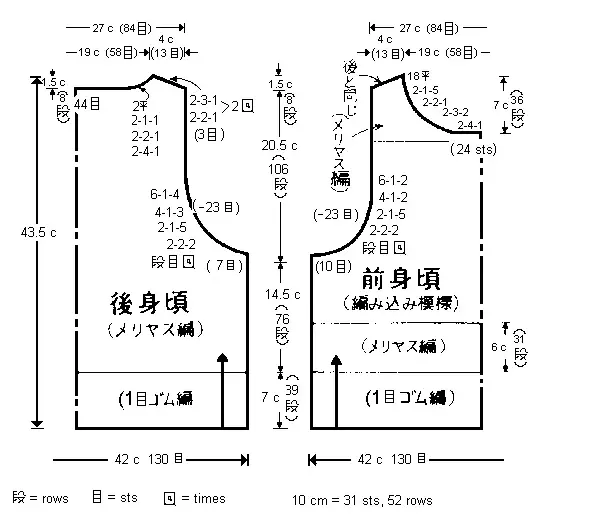
Look at the very bottom of the chart. On the left side of the chart are three symbols. These are the ones most commonly used symbols at the Japanese charted, and if you learn these three symbols, plus the one at the very top of the back armhole, just under the shoulder slope, which somewhat resembles a T, you will be able to knit from a Japanese chart and amaze your family and friends 😀 . The symbol for rows is the first one at lower left. It resembles a capital F, with two extra arms, coupled to a symbol that often looks like an R over an x. The stitch symbol looks like a ladder, and the times symbol looks like a box with a dot in it. At the lower right is a notation that 10 cm = 31 sts, 52 rows.
For knitters who use the metric system ignore this paragraph because you do not need to convert to inches. As stated earlier, 10 cm is almost 4″. Actually it is just a hair over 3.9″ Most of the time, simply dividing by 4 will give you results close enough. That is what we are going to do in this instance. 31 divided by 4 equals 7.75 stitches per inch. 52 divided by 4 equals 13 rows per inch. It might not be possible to match this gauge. We will not tackle the issue of recharting for a different yarn right now. The main reason of this article is to learn how to read the chart.
Let’s Convert This Japanese Charted Patterns
Let’s start with the Back. The dotted vertical line means that this is half a pattern; it is similar to marks on the center back of a sewing pattern which indicate it should be placed on a fold of the fabric. The line at the bottom, extending out past the center vertical means that the entire garment width is 42 cm, or 130 sts. The number 1 plus the ladder (stitch symbol) in the band indicate that it should be done in 1×1 ribbing. You are have to know that ribbing is worked at a tighter tension than Stockinette. In the middle of the Back, the large characters means “Back” and the smaller ones under them mean “Stockinette”. If read this guide you will be able to find this just from looking at the schematic, and at the photo of the garment. So, when we start knitting this pattern, we cast on 130 sts at tension appropriate for ribbing, which is usually 2 full numbers less than Stockinette tension. Knit even 39 rows, as shown in the vertical space between Back and Front at the band length. Since there are arrowheads at each lengthwise section, we are supposed to turn the row counter back to 000. Change to Stockinette, knit even to armhole, RC 76, and reset the row counter to 000, as indicated by the arrowheads.
At the armhole line, first there the symbols for rows, stitches, times, then the numeral 7 and the stitch sign in parentheses. This means that the shaping formula is rows-stitches-times (every xx rows, decrease xx sts xx times). We will do the armhole shaping, exactly as it is charted. Please note that the same shaping must be worked on both sides.
1. 7 plus stitch symbol = Bind off 7 sts at the beginning of the next row.
2. 2-2-2 = every 2 rows bind off 2 stitches 2 times.
3. 2-1-5 = every 2 rows decrease 1 stitch 5 times.
4. 4-1-3 = every 4 rows decrease 1 stitch 3 times.
5. 6-1-4= every 6 rows decrease 1 stitch 4 times.
This completes the armhole shaping. The -23 plus the stitch symbol at lower armhole means that are 23 of stitches you should have been decreased from each armhole edge. If we add all of the stitches in steps 1-5 above, we see that’s exactly what we wanted. For more information look at the very top of the chart. The line indicating back width shows 27 cm, and 84 stitches remaining. 130 stitches, the amount at the cast on edge, less 46 sts (23 from each armhole) equals 84 stitches.
And now we are looking between Back and Front sections to find the armhole length line, we notice that there are 106 rows between base of armhole and beginning of shoulder shaping.Now, knit even to RC 106. In this particular pattern there are 8 rows for neck shaping, and 8 rows for shoulder shaping. You can find this at the top of the charted pattern. Numbers at center back line indicate neck depth, and numbers between Back and Front indicate shoulder depth. The neck shaping figures are inside the Back outline, and the shoulder shaping figures are outside. We are suggesting to crea a cheat sheet before start knitting cause this part contains complicated shaping. First reset the row counter to 000, as indicated by the arrowheads. We will assume that the carriage is on the right. The line directly above the schematic indicates that there are 13 sts in each shoulder, and 58 sts in the neck. The numeral 44 plus the stitch sign at top of center back line indicates that there are 44 stitches in center back neck. 7 stitches are in the neck shaping on each side. We will assume that the neck and shoulders are shaped by placing stitches into hold position.
RC 000, carriage on right. Place center 44 stitches, plus all other stitches left of center 0 into hold position. Set carriage to hold. Knit 1 row to the left, wrap first holding pos (HP) needle.
RC 001, carriage on left. Place 3 sts at right into HP for shoulder, Knit 1 row to the right, wrap first HP needle.
RC 002, carriage on right. Place 4 sts into HP for neck, Knit 1 row to the left, wrap first HP needle.
RC 003, carriage on left. Place 2 sts into HP for shoulder, Knit 1 row to the right, wrap first HP needle.
RC 004, carriage on right. Place 2 sts into HP for neck, Knit 1 row to the left, wrap first HP needle.
RC 005, carriage on left. Place 3 sts into HP for shoulder, Knit 1 row to the right, wrap first HP needle.
RC 006, carriage on right. Place 1 st into HP for shoulder, Knit 1 row to the left, wrap first HP needle.
RC 007, carriage on left. Place 2 sts into HP for shoulder, Knit 1 row to the right, wrap first HP needle.
RC 008. The “T” symbol means that shaping is completed at the neck edge, and to knit 2 rows even. Therefore, just Knit 1 row to the left, and DO NOT wrap. 3 stitches remain in work position at the shoulder, as indicated by the 3, plus the stitch symbol in parentheses. Push the 10 HP shoulder stitches back about halfway on the bed (upper work position), Knit 1 row over all 13 shoulder stitches, and remove on waste yarn. Return left side to work pos and knit to correspond, reversing the shaping. When shoulder is completed, Knit 1 row main color across back neck sts, then remove on waste yarn.
Front is made similarly. A large intarsia pattern begins 31 rows above the waistband, as indicated by the line across the lower Front, and the row symbol plus numeral 31 on the right side. We will do the armhole shaping, exactly as it is charted. Please note that the same shaping must be worked on both sides.
1. 10 plus stitch symbol = Bind off 10 sts at the beginning of the next row.
2. 2-2-2 = every 2 rows bind off 2 stitches 2 times.
3. 2-1-5 = every 2 rows decrease 1 stitch 5 times.
4. 4-1-2 = every 4 rows decrease 1 stitch 2 times.
5. 6-1-2= every 6 rows decrease 1 stitch 2 times.
This shaping makes the front armhole narrow in faster than the back armhole. Now comes the trickiest part of the whole pattern. We must knit even to the neck edge. However, the row count number for this is not given. We must determine it mathematically. On the left side, the chart indicates there are 36 rows in the neck shaping. There are 106 rows for the armhole, plus an additional 8 rows for the shoulder shaping. 106 plus 8 equal 114 rows for total length above armhole. 114 minus 36 equal 78. Therefore we begin the front neck shaping on RC 78. Front shaping will be a little simpler than the Back, since neck shaping ends before shoulder shaping begins. We know this beacuse the final shaping note at the front neck edge is the numeral 18 plus the funny “T”, idicating 18 rows even after the last shaping row. Since there are 8 rows in the shoulder, there will be 10 rows even, with no shaping, between last neck decrease and first shoulder decrease. We will now write out the actual pattern.
RC 78. Carriage on right. Place center 24 sts, plus all other sts left of center 0 into HP. Set carriage to hold. Knit 1 row across to the left, wrap first HP needle, knit back to right.
RC 80. 2-4-1 = every 2 rows place 4 sts into HP 1 time.
RC 82. 2-3-2 = every 2 rows place 3 sts into HP 2 times.
RC 86. 2-2-1 = every 2 rows place 2 sts into HP 1 time.
RC 88. 2-1-5 = every 2 rows place 1 st into HP 5 times. This completes the neck shaping. Knit even to RC 106, same length as Back to shoulder.
Set row counter to 000. Knit 1 row across to the left. Place 3 sts into HP at right, knit 1 row, wrap first HP needle, knit back to left. Place 2 sts into HP at right, knit 1 row, wrap first HP needle, knit back to left. Place 3 sts into HP at right, Knit 1 row, wrap first HP needle, Knit back to left. Place 2 sts into HP at right, Knit 1 row to left. 3 sts remain in work pos. Push the 10 HP shoulder sts back half way to upper work pos, Knit 1 row to the right with main color, then remove on waste yarn. Return left side to work pos and knit to correspond, reversing all shaping. When left shoulder is completed, Knit 1 row MC across front neck sts, then remove on waste yarn.
See Also
