

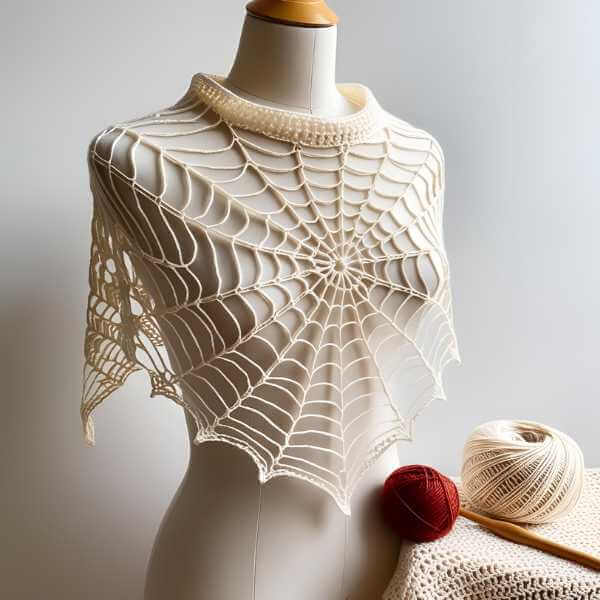
Are you ready to create an accessory that adds a touch of elegance to any outfit? The Spider Web Shawl is a beautiful piece and a manageable project for crocheters of all skill levels, from beginner to advanced.
This guide provides a step-by-step approach through the foundation chain and each row of the pattern, ensuring a clear understanding of the intricacies of this delicate design. It also includes tips for finishing touches such as blocking, adding fringe, and exploring crochet terminology.
Gather your yarn and hook to begin this enjoyable project, exploring the world of crochet and crafting a unique shawl.
How to Crochet the Spider Web Shawl: A Creative DIY Project
The Spider Web Shawl is an elegant crochet project that merges the delicate nature of lacework with the artistry of handmade shawls. This shawl pattern accommodates beginner crochet enthusiasts, intermediate crafters, and advanced artists interested in exploring intricate designs.
Utilizing various crochet techniques, it transforms simple yarn into a visually appealing wrap that highlights the beauty of crochet stitches and the versatility of different yarn types. Whether for gifting or personal use, this lightweight shawl is a valuable addition to any wardrobe essential, making it suitable for various seasonal styles.
1. Foundation Chain
The foundation chain is the starting point for crocheting the Spider Web Shawl, creating the base for all subsequent crochet stitches. This initial chain establishes the tension and gauge for the shawl, making it important for the overall success of the project.
To create a foundation chain, select a yarn that aligns with your desired style and weight. It is important to maintain consistent tension throughout the chain, as uneven stitches can result in an inconsistent fabric. A gauge swatch is recommended for achieving the correct tension. Aim for the recommended row count specified in your pattern to ensure a proper fit for the shawl. Using stitch markers to mark specific intervals can help track progress and identify any inconsistencies.
For those interested in personalizing their shawl, experimenting with variations in the chain, such as adding decorative stitches, color changes, or using self-striping yarn, can be considered for a custom look.
2. Row 1
Row 1 of the Spider Web Shawl introduces the initial crochet stitches that form the foundational lacework pattern, which is essential for achieving the desired drape and texture of the shawl. This row sets the framework for the rest of the project, guiding the crocheter through the pattern repeat with clear written instructions.
Each stitch should be crafted with precision, as any deviation can lead to inconsistencies in the final design. To begin, it is important to create a stable foundation chain that is neither too tight nor too loose, allowing the work to progress smoothly.
By carefully following the instructed stitch count for Row 1, the crocheter will develop a strong base and ensure that the subsequent rows build harmoniously on this groundwork. This attention to pattern integrity ultimately enhances the overall visual appeal, resulting in a stunning lace shawl that embodies both elegance and artistic flair.
3. Row 2
In Row 2, crocheters build on the techniques learned in Row 1, adding complexity to the lacework and enhancing the shawl’s texture. A clear crochet diagram can be helpful at this stage to visualize the intricate patterns that emerge.
To begin, it is important to follow the recommended stitch sequence, ensuring each stitch blends seamlessly with the previous row. Starting with a foundation chain, the next step involves establishing a rhythm by alternating between double crochets and chains, which form the foundational lace.
As progress continues, customizing the pattern by adjusting the number of chains or experimenting with different yarn weights, such as thread or bulky yarn, can lead to various results. For example, using a heavier yarn may create a more substantial look, while lighter weights can result in delicate finishes. Selecting a vibrant color palette can also personalize the shawl, allowing crocheters to express their individual styles.
4. Row 3
Row 3 builds on the established crochet stitches by incorporating advanced techniques that enhance the shawl’s design with depth and intricacy. The choice of yarn brands and yarn types, such as cotton or acrylic, at this stage can significantly affect the final texture and drape.
To navigate this row successfully, it is important to become familiar with stitches such as cluster stitches and double crochets. These stitches not only enhance the visual appeal but also contribute to the overall structure of the project. Maintaining consistent tension is crucial; using accessories like stitch markers can help track stitch placement effectively. Selecting the appropriate crochet hook size ensures that each stitch is uniform, resulting in a balanced appearance.
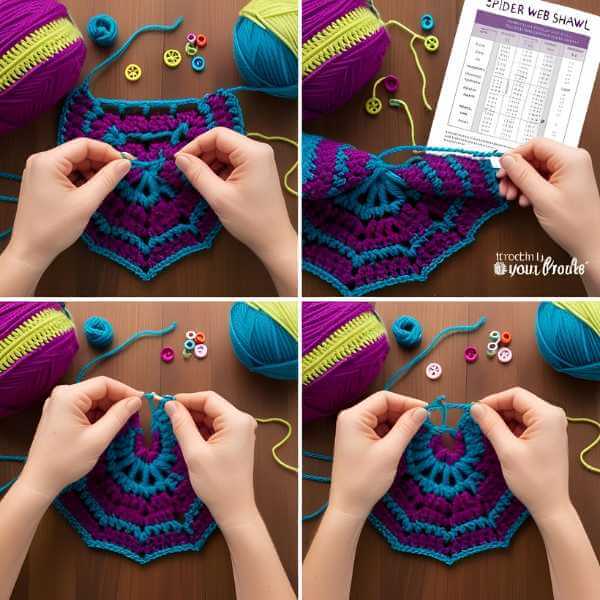
With these tools available, crocheters can focus on their technique, allowing creativity to thrive without compromising quality. Utilizing a stitch dictionary can offer additional inspiration for unique motifs.
5. Row 4
As the crochet project progresses to Row 4, the lightweight shawl begins to take shape, displaying visual patterns that enhance its aesthetic appeal. This row introduces unique crochet motifs and chart-based designs that characterize the Spider Web Shawl.
In this row, the intricate stitches come together to create delicate, eye-catching designs that reflect elegance and craftsmanship. Each motif is carefully constructed, featuring strategically placed chains and clusters, which add texture and depth to the piece.
It is suggested that readers experiment with different yarn types and colors, as this can significantly change the overall appearance of the shawl, allowing personal style to emerge. Whether choosing vibrant hues for a bold statement or softer tones for a more subtle elegance, the selections made at this stage can elevate the finished project.
6. Row 5
Row 5 is important for establishing the shawl’s texture and drape, employing refined crochet techniques to create a cohesive design. This row typically requires careful attention to the pattern instructions to achieve the intended results.
As crocheters approach this stage, it is crucial to monitor tension closely, as this directly affects both the fabric’s structure and its overall comfort. Adjusting the tension slightly, either tighter or looser based on personal preference, can improve the shawl’s drape and flexibility. Using a more relaxed grip may help if the texture feels too stiff, allowing the yarn to flow more freely and contributing to a softer finish.
The successful completion of Row 5 plays a significant role in how well subsequent rows align, ultimately enhancing the visual and tactile qualities of the finished piece.
7. Row 6
In Row 6, crocheters can find inspiration from crochet classes, blogs, and online tutorials that offer helpful techniques to further enhance their skills. Engaging with the crochet community can provide valuable insights during this stage of the project.
These resources typically cover specific stitches and tips that can significantly impact the overall outcome. For beginners, participating in structured learning, whether in person or through virtual platforms, helps build confidence and proficiency.
Joining crochet groups or forums allows individuals to share their progress, ask questions, and receive constructive feedback. This sense of community not only encourages learners to persist but also fosters friendships among fellow crocheters who share a common interest in creating beautiful handmade items and exploring fiber arts.
8. Row 7
Row 7 marks a significant advancement in the development of the shawl by introducing crochet accessories that assist in the finishing techniques needed for a polished look. This is particularly important for creating a seasonal shawl or a cozy wrap that can be worn throughout the year.
To ensure that every edge is perfectly finished, using finishing needles is valuable. These tools help with weaving in loose ends seamlessly, resulting in a clean and professional appearance for the project.
After completing the shawl, proper blocking is essential as it enhances the final shape and adds a graceful drape. By wetting the piece and laying it flat to dry, any uneven stitches will smooth out, and the intricate patterns will become more pronounced, transforming the shawl into an accessory that showcases craftsmanship.
This attention to detail can elevate a simple shawl into a cherished wardrobe staple.
9. Row 8
As the crochet artist reaches Row 8, the focus shifts to the edges of the shawl, where techniques for adding fringe and embellishments can be incorporated for a decorative touch. Understanding crochet terminology is important at this stage for successfully creating a DIY shawl.
This stage not only enhances the shawl’s appearance but also allows the artist to express their individuality. To create the ideal fringe, various edging techniques can be explored, each offering a distinct visual appeal.
- One option is the classic chain stitch, which provides a neat finish.
- While a more intricate scalloped stitch or slip stitch edging can add an elegant touch.
As the artist experiments, they can mix colors, yarn textures, and use color-changing or gradient yarns to develop a unique pattern. By allowing creativity to flow, this step becomes an opportunity to showcase a one-of-a-kind design that reflects personal style and craftsmanship.
10. Row 9
In Row 9, the shawl design becomes more intricate, highlighting the use of crochet motifs and lacework that align well with seasonal fashion trends. This stage may also offer opportunities for crochet artists to create handmade gift ideas for loved ones, enhancing their craftsmanship and creativity.
These motifs can include delicate flowers or geometric shapes, each contributing a unique touch to the overall piece. As the crochet project progresses, the careful placement of these elements enhances visual interest and displays the artist’s skills, creativity, and expertise in fiber arts.
Readers are encouraged to consider creating a downloadable PDF pattern, which could make sharing with fellow enthusiasts easier or serve as a thoughtful gift for friends and family interested in crochet. This digital format can simplify the learning process, making it accessible for both beginners and experienced crocheters, enhancing their DIY projects.
11. Row 10
Row 10 focuses on enhancing the visual appeal of the shawl by incorporating various stitch patterns that highlight different crochet techniques, such as double crochet and chain stitch. This step is essential for transforming the shawl into a fashionable accessory.
As crocheters work on this row, they can explore intricate stitches such as the shell stitch, popcorn stitch, or a delicate lace pattern. Each technique adds depth to the design, creating a blend of textures and shades that can be customized to reflect individual style, using a color palette that enhances the shawl’s aesthetic.
Encouraging creativity in this row not only enhances the shawl’s aesthetics but also demonstrates its versatility—suitable for dressing up an outfit or providing warmth on cooler days. The final result is more than just a completed project; it becomes a piece of wearable art that can make a statement with its unique design and personal touch.
12. Row 11
As crocheters progress to Row 11, they may find inspiration from the crochet community’s innovative layering techniques, which can transform the shawl into a distinct artistic piece. Engaging with crochet blogs and online classes can offer additional insights and ideas.
By experimenting with various stitches and textures during this row, crafters can add dimension and depth, enhancing the aesthetic appeal and functionality of their work. For example, incorporating contrasting yarn colors or unique stitch patterns not only highlights individual style but also encourages creativity in the project, reflecting modern and traditional influences.
Thoughtful layering can create striking effects, making the shawl more adaptable for various occasions.
As individuals explore these techniques, they will see how a simple row can act as a catalyst for numerous possibilities, ultimately leading to a well-crafted accessory that serves as a testament to their craftsmanship.
13. Row 12
In Row 12, understanding crochet terminology is essential for successfully following the pattern reviews that guide crocheters through intricate details. This is also a good opportunity to share project ideas on social media crochet platforms, engaging with online crochet communities for feedback and support.
As you begin this row, take a moment to familiarize yourself with the key terms and stitches that will shape your project. Engaging with online crochet communities is valuable; these spaces provide a wealth of knowledge where fellow crafters share their tips and creative solutions.
It’s important to ask questions or post progress photos—community feedback can inspire new ideas or clarify any challenging aspects of your work. Embracing the support of fellow crocheters can enhance your technique and make your crafting journey more enjoyable.
Finishing the Shawl
Completing the Spider Web Shawl involves a variety of techniques that contribute to a polished and visually appealing final product. One of the most important steps in this process is blocking, which helps shape the shawl and enhances its unique designs and features, ensuring a smooth drape and elegant finish.
1. Blocking
Blocking is an important technique that allows crocheters to shape and texture their shawl, ensuring that the stitches are visually appealing and evenly distributed. Maintaining proper tension during the blocking process is crucial for achieving the desired results, especially when working with gauge swatches to determine gauge.
To effectively block a shawl, several tools can enhance the process, including blocking mats, pins, and a spray bottle filled with water. Start by laying the shawl flat on the mats, gently stretching it into the desired shape while being attentive to the stitch definition. Use rust-proof pins to secure the edges, ensuring that the fabric remains undistorted and that the stitch patterns are highlighted.
It is recommended to lightly mist the shawl with water for even dampening, which aids in setting the stitches effectively. Paying attention to detail during this blocking phase can greatly enhance the overall texture and drape, resulting in a polished final product that reflects the crocheter’s craftsmanship.
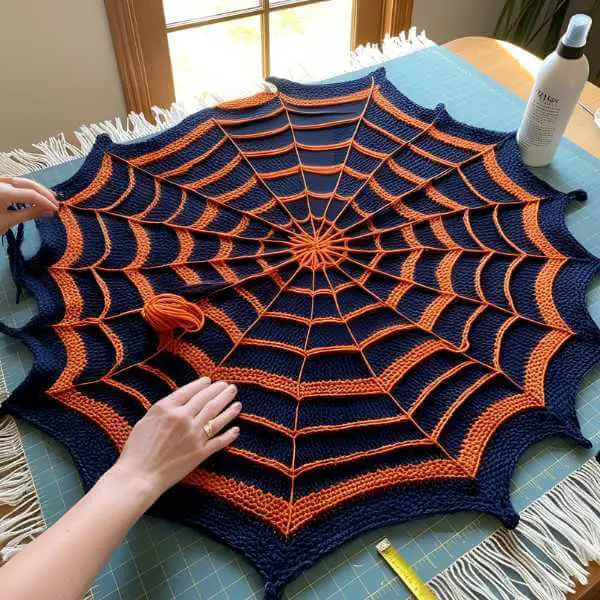
2. Adding Fringe (Optional)
Adding fringe to a shawl is an optional yet popular finishing technique that can provide a playful touch and enhance the overall appearance of the seasonal shawl. Choosing the right crochet accessories and embellishments can elevate the shawl’s aesthetic appeal.
To start, it is important to consider the type of fringe that best complements the shawl’s style—options can range from delicate strands to chunky tassels. Consider the overall tone you want to convey; for a bohemian vibe, longer, textured fringes might be suitable, while a sleek design may benefit from shorter, uniform lengths. Experiment with color-changing yarns for added visual interest.
Once the type is chosen, measuring the desired length is crucial, with fringe lengths typically ranging from 6 to 12 inches. It can also be beneficial to mix and match colors or textures to create a unique look. Embracing creativity by experimenting with various knot styles or layering can turn the shawl into a personalized piece that reflects individual flair.
Tips and Tricks for Crocheting the Spider Web Shawl
Crocheting the Spider Web Shawl can be a rewarding experience, particularly when utilizing tips and tricks from the crochet community and various online tutorials, including instructional videos. These insights can enhance crochet skills and make the crafting process more enjoyable and efficient.
Frequently Asked Questions
What is a Spider Web Crochet Shawl Pattern?
A Spider Web Crochet Shawl Pattern is a type of crochet pattern that creates a delicate, lacy shawl with intricate spider web-like designs. It typically involves crocheting with thin yarn and a small hook to create a delicate and lightweight finished product, perfect for those who appreciate textile and fiber arts.
What materials do I need to make a Spider Web Crochet Shawl?
To make a Spider Web Crochet Shawl, you will need thin yarn, a small crochet hook, scissors, and a tapestry needle. You may also want to have stitch markers and a blocking board to help with the project, along with other notions to facilitate the process.
Is the Spider Web Crochet Shawl Pattern suitable for beginners?
This pattern may be challenging for beginners due to its intricate design and use of thin yarn. It is recommended for those with intermediate to advanced crochet skills, but beginner-friendly versions can be explored as well.
How long does it take to complete a Spider Web Crochet Shawl?
The time it takes to complete a Spider Web Crochet Shawl will vary depending on your crochet speed, the complexity of the pattern, and your skill level. On average, it can take anywhere from 10-20 hours to complete.
Can I customize the size of the Spider Web Crochet Shawl?
Yes, the size of the shawl can be easily customized by adjusting the number of stitches and rows in the pattern. You can also use thicker yarn and a larger hook to create a larger shawl, ensuring the fit of a shawlette or an oversized wrap.
What are some tips for crocheting a Spider Web Crochet Shawl?
Some tips for crocheting a Spider Web Crochet Shawl include using stitch markers to keep track of your progress, blocking the finished shawl for a more polished look, and taking breaks to avoid hand fatigue. It is also helpful to work in a well-lit area to see the intricate details of the pattern, ensuring each stitch is perfect.
