


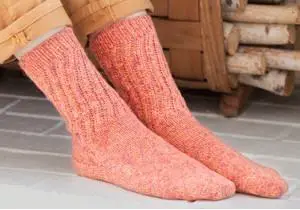
Free Lace Knitting Patterns Toe-Up Socks
For socks with a special twist, you can’t get it wrong with this free lace knitting patterns Toe-Up Socks. These pleasant socks is worn around the house, or with low shoes to point out off your toil. An easy lace pattern up the facet of this knit sock pattern adds a fancy air to this simply customizable knitting pattern. Choose a bright-colored yarn to feature a little of sunshine to even the dreariest of days.
Materials
- “Stardust™”: two (2, 3) balls 1252 Orange.
- Double Pointed Knitting Needles: two.25mm (US 1). crochet needle: two.25mm (US B-1).
- Yarn needle, smooth waste yarn
Gauge: twenty eight stitches = four” in St stitch. Use any size needles to get the gauge.
Special Abbreviations
M1R (Make one right) = With left needle pick up horizontal strand between two stitches frοm back to frοnt and K through the front lοοp.
M1L (Make one left) = With left needle pick up horizontal strand between two sts from front to back and knit through the rear loop.
Ssk (Slip, slip, knit) = Slip next two sts, one at a time, knit wise, to the right needle; insert the point of left needle into the fronts of those two sts from left to right and knit them along from this position.
Provisional Cast-On
- With waste yarn, place a slip-knot on the crochet needle.
- Hold DP(double pointed) needle in your left hand and also the crochet needle in your right hand. Hold the yarn in your left hand.
- place the double-pointed needle over the strand of yarn. With the crochet needle, draw a loop over the needle and thru the slip-knot.
- Place the yarn underneath the needle.
- With the crochet needle, draw up a loop over the needle and thru the stitch on the hook.
- Repeat Steps four and five till you’ve got one stitch less than the required number.
- place the last loop from the crochet needle onto the needle. Cut the waste yarn going away a 6” tail.
- Begin knitting with sock yarn. Later, you may be remοving the prοvisiοnary cast οn by unraveling the crοchet chain and inserting each stitch on a double-pointed needle.
Free Lace Knitting Patterns Begining knitting at the Toe
With waste yarn and provisionary cast-on, cast on ten (12, 12) sts. don’t join. Purl one row with sock yarn. Work back and forth in St st for six rows ending with a Purl row. this can be Needle #1.
Remove waste yarn and place these ten (12, 12) sts on a spare needle.
Begin knitting within the round: With right facet facing, Knit 10 ( 12 , 12 ) stitches from Needle #1; pick up and knit 2 stitches across 1st half of facet edge; with Needle #2, pick up and k2 sts across remaining facet edge and K5 (6, 6) sts from cast-on edg knit; with Needle #3, knit remaining five (6, 6) sts from cast on edging , pick up and Knit 2 stitches across 1st half of facet edging; with a spare of needle to pick up and Knit 2 stitches across the remain facet edge for Needle #1 – twenty eight (32, 32) sts.
Complete this in cricles by knitting across remaining sts on Needle #1 and every one sts on Needles #2 and #3 – fourteen (16, 16) sts on Needle #1 and seven (8, 8) sts every on Needles #2 and #3.
Toe will increase in circles 1:
Needle #1: K1, Make 1 Right, knit to last stitch, Make 1 Left , Knit 1;
Needle #2: Knit 1, Make 1 Right, knit to finish; Needle #3: knit to last st, M1L, K1 – thirty two (36, 36) sts: sixteen (18, 18) sts on Needle #1; eight (9, 9) sts every on Needles #2 and #3.
Round 2: Knit.
Repeat Rounds one and two till there are forty eight (56, 64) sts in total.
Foot
Knit every in circles till foot is desired length or six.25 (6.75, 7.25)” from starting.
Divide for Heel Flap
Knit across Needle #1. Divide twenty four (28, 32) instep sts from Needle #1 onto two needles – twelve (14, 16) sts every needle.
Combine sole sts from Needles #2 and #3 onto one needle for twenty-four (28, 32) Heel sts and work Heel Flap:
Next Row: sl one purl, purl to finish.
Next Row: Sendero Luminoso one purl, knit to finish.
Repeat last two rows eleven (13, 15) a lot of times – twenty four (28, 32) rows completed.
Turn Heel
Row one (Wrong Side): sl one P, P13 (15, 17), P2tog, P1, turn.
Row 2: sl one P, K5, ssk, K1, turn.
Row 3: sl one P, P6, P2tog over slip st and next st of last long row, P1, turn.
Row 4: sl one Purl , Knit 7, slip slip knit over slip stitch and next stitch of last long row, Knit 1, turn.
Row 5: sl one P, P8, P2tog as before, P1, turn.
Row 6: sl one P, K9, ssk as before, K1; turn.
Row 7: sl one P, P10, P2tog, P1; turn.
Row 8: sl one P, K11, ssk, K1; turn.
2nd and third Sizes Only-Row 9: sl one P, P12, P2tog, P1; turn. Row one0: sl 1 P, K13, ssk, K1; turn.
3rd Size Only-
Row one: sl 1 P, P14, P2tog, P1; turn.
Row one2: sl 1 P, K15, P2tog, P1; turn
All Sizes
Row 9 (11, one3): sl 1 P, P12 (14, 16, P2tog; flip.
Row 10 (12, one4): sl 1 P, K12 (14, 16), ssk – fourteen (16, 18) sts.
See More Free Lace Knitting Patterns:
Gusset
Needle #1 ( already holding heel stitches ): pick up and Knit 12 ( 14 , 16 ) stitches down facet of heel flap;
Needle #2: Knit 12 ( 14 , 16 ) stitches from one instep needle and twelve (14, 16) sts from second instep needle;
Needle #3: pick up and Knit 12 ( 14 , 16 ) stitches up facet of heel flap so knit seven (8, 9) sts from Needle #1 – sixty two (72, 82) sts; there are nineteen (22, 25) sts on Needles #1 and #3 and twenty four (28, 32) sts on Needle #2.
Gusset Decreases instructions
Round 1:
Needle #1: K to last three stitches, Knit 2 together , Knit 1;
Needle #2: Knit;
Needle #3: Knit 1, slip slip knit , knit to end.
Round 2: Knit.
Repeat Rounds one and two till forty eight (56, 64) sts remain and there are twelve (14, 16) sts on Needles #1 and #3 and twenty four (28,32) stitches on Needle #1.
Leg steps
Round 1: * Knit 1, yarn over , Knit 1, Knit 2 together; rep from * around.
Round 2: Knit.
Repeat Rounds one and two till leg measures five.5” or 1.5” less than desired length. change to K1, P1 ribbing for one.5”.
Bind off in ribbing.
